The post Supernova Difficulty Guide – The Outer Worlds Hard Mode Survival appeared first on Fextralife.

Whilst The Outer Worlds is not exactly a hard game, however, playing on the game’s hardest difficulty: Supernova can be quite arduous. Not being able to fast travel, having extremely limited auto saves, and of course perma death for your Companions can make even easy things much more complicated. In this Supernova Difficulty Guide, we’ll show you how to deal with things, so that you can enjoy the challenge, without getting frustrated or stuck.
The Outer Worlds Guide to Supernova Difficulty
As with other RPGs, particularly RPGs Obsidian has made, the beginning portion of the game is generally the hardest when playing on the highest difficulty setting. Pillars of Eternity 2 was the same way, for the most part, and players need to get over “the hump” before things start to smooth out and you can really enjoy the ride that is Supernova. For this reason let’s take a look at Character Builds first, as this will drastically affect how well you do through out the game.
Supernova Character Builds
When making a character for Supernova difficulty, it’s very important that you commit to the type of Build that you decide to play. That means that you have an idea if it’s melee, or ranged, what sort of weapons you’ll be using etc, and you aren’t going to second guess yourself when things get tough and decide to try something else. You will die a time or two in Emerald Vale, don’t blame your Build when this happens, or you’ll get stuck in a vicious cycle of starting over and not getting anywhere. It does not matter what sort of character you decide to play, you can make it through Supernova, but some Builds will have an easier time than others.
Ranged Characters in Supernova
With that in mind, I strongly advise playing some sort of ranged character for Supernova, unless you are using the Prismatic Hammer. This is because picking off an enemy or two before the others can even get in range to shoot you will generally save your butt early on, and help to keep your Companions alive. While Armor can really make a difference, it is very difficult to upgrade it high enough to mitigate all the damage you will take from enemies, and they tend to hit hard. The best defense is a good offense, and not getting hit is the best way to avoid dying.
Ranged characters should invest in Intelligence, Perception and Temperament. These things will help you deal the most possible damage, while at the same time topping off your Health between encounters. I wouldn’t invest more than a point or two into Temperament, but it really comes in handy in Supernova.
Melee Characters in Supernova
You are going to have a much harder time at the beginning of your Supernova playthrough if you went the melee route, and having the highest possible Armor will be an absolute necessity. You should attempt to pick off one enemy from each group with a Power Attack while Sneaking, to help thin the group before they open fire on you. If you’re clever you can usually get more than one.
Place points into Strength, Intelligence and Temperament for the most damage and surviveability. Consider dropping a point from Perception and placing 2 points into Temperament for even more Health Regeneration. You’ll want to make sure that you have Toughness and Resilient as quickly as possible to help with survival, and dump points early on into Block for even more Armor.
Skill, Companions and How to Achieve Success in Supernova
One of the really great things about Supernova is that it will really test your strategy in combat compared to lower difficulties, and part of that is because you will have to keep an eye on your Companions or they will die permanently. Building your character with the right Skills and Perks to more incorporate your Companions is key, and in this section I’ll tell you how to do just that.
How to Keep Your Companions Alive in Supernova
Keeping Parvati and Vicar Max alive in Emerald Vale will likely be the most challenging part of the early goings of the game. You cannot send Parvati back to the ship until you’ve completed this area, though you can Max when you recruit him, but there’s no reason to have 1 Companion when you can have 2. You can get them both rather quickly, and I suggest that you do Max’s quest line and get him ASAP in order to have more firepower, and more targets for enemies to shoot at, spreading out the damage.
Make sure that you keep everyone in your group stocked with the heaviest Armor you can early on, to keep them alive. It does not matter if you take penalties to Stealth Skills, wear Heavy Armor, and make sure you Tinker everyone’s Armor up a little bit to help protect them further. Repair it when needed, and make sure that everyone is at full Health when you go into battle.

Leadership is Key
The Leadership Skill is key to survival early on and it does several things for you. First, it’s going to allow your Companions to use their Abilities, and both Parvati’s and Max’s Abilities hit hard and CC enemies. This can really help manage the battlefield, and prevent you or your teammates from taking damage, especially against harder hitting enemies with higher health pools that don’t go down easily. Get comfortable with these Abilities, and learn when and how to use them.
Secondly, Companion Armor Rating will be boosted by 20%, helping to keep them alive. Again, no one can have enough Armor in Supernova, so the more the better.
Third, when you heal with the Inhaler, you will heal your Companions for 30% of the Health returned to you. This allows you to “oh shit” heal them when they may be about to die, and can sometimes be the difference between saving them or watching them die before your eyes. This will be further enhanced when you hit 60 in Determination, so aim for that and get there when you can.
You’ll gain half of your Companions’ total skill value at 60 Inspiration, instead of a quarter, making you much more effective at Skill Checks. This will allow you to keep dropping points into things that make you hit harder or harder to kill, and not get locked out of many dialogue choices.
Last, Companions gain damage and health passively for each point spent, further boosting their own effectiveness. If they can kill things too, then things get a whole lot easier. Make sure you gear them with good Weapons, and replace them when you see better ones.

Companion Perks Matter
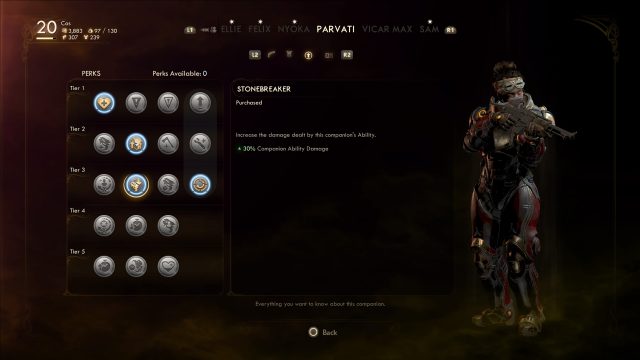
Companion Perks are very important in Supernova, and you want to pick things that help them stay alive. Healthy should always be your first choice, because 30% more Health is a lot. Battle Hardened is also a good choice for Perk number 2, or you can pick Sneaky if you wish, but you don’t necessarily want everything to attack you. Stonebreaker helps increase Companion Ability damage to a point it can usually one shot many enemies, so take that at Tier 3. Shake it off is a solid choice at Tier 4 because damage over time effects can destroy a Companion easily on Monarch, and this Perks makes them wear off faster. Stand Your Ground is a great choice for Tier 5, for further increased Armor.

Final Tips
Early on you’ll need to sleep in the cot on your ship near the Workbench because the Captain’s quarters will not be open yet. Don’t try to do all of Emerald Vale without sleeping, because as your sleep (or food or drink) bar begins to deplete you will take penalties to your Attributes. If at any time you go to your Attribute screen and see penalties that you didn’t apply during Character Creation, make your you sleep, or eat or drink.

If you need Water or are having a hard time finding any, buy it from Vending Machines. I always buy some any time I see one because it is needed the most often, and it’s not super expensive. Look out for Dehydrated Water, Plain N’ Pure Water or Glacier Water and buy these when you can. You can use sugary drinks as well when in a pinch, but always stock up when you can.

Avoid combat if you can early on, and complete quests to gain XP. If you don’t feel comfortable taking on a pack of enemies, or they’ve already killed you once or twice, avoid them and come back later. There are a couple of spots in Emerald Vale that have 6+ enemies at once, and it’s very easy to die or lose a Companion in these places. Come back when you are higher level and a bit more geared up.
Deconstruct Armor and Weapons you don’t need early on for parts, but then begin selling things you don’t need for Bits so that you can Tinker your Armor and Weapons up higher for improved performance. Tinkering good gear can make all the difference in the world, but if you deconstruct everything you won’t have the Bits to do it. And if you don’t deconstruct anything, then you can’t repair your Armor. It’s a fine balance, but make sure you do both.
If your Companions keep dying set them to Defensive so that they quit chasing every god damn enemy and getting themselves killed. This will make them quite a bit less effective than normal, but sometimes all you need them to do is not die. Switch them back to Aggressive after you’ve resolved and encounter this way, because they are “usually” fine this way. Usually…

Lastly, when selecting Tier 2 Perks pick We Band of Brothers and Rolling Thunder for increased cooldown on Companion Abilities. You can perma CC enemies with Companion Abilities if you do this, and you will need to on harder hitting ones like Mega Mantiqueens and Mega Primals or someone will die.

Stay tuned for more Outer Worlds coverage and be sure to check out our Getting Started, Character Creation, Best Weapon and Build Guides if you’re looking for more content, and check out our Review if you’d like to know our thoughts on the game.
The post Supernova Difficulty Guide – The Outer Worlds Hard Mode Survival appeared first on Fextralife.
from Fextralife https://ift.tt/2PmGOOu
Castielle https://ift.tt/2JqoLCW October 26, 2019 at 11:11AM https://fextralife.com


No comments:
Post a Comment